Oct 2, 2013

More on Fimo madness

I´ve got a Fimo madness. Here are some of the results made by using the same technique as in the last post:


Nuff said.

Oct 1, 2013

Horsing around

I got very inspired by modelling clay after a really long time. The reason for such an inspiration was my friend who had done some repro jewelry pieces out of Fimo clay. I have used Cernit modelling clay before, but as my friend recommended  the Fimo, I decided to try it out. And it was a good decision! Fimo is much more ductile and light than Cernit and the colors don´t change when you harden the clay in  an oven.

Here are some 1930's-40's repro pieces I have made of Cernit modelling clay:


The theme for my Fimo-experiment came to me when I was browsing the net. I searched for some celluloid and bakelite jewelry. I´ve always admired the beautiful bakelite and wooden horsey brooches and other jewelry. They were made in the 1930's-40's in many delicious and rich colors:

(from here)
(from here)
(from here)

And then there is this:

Oh, my sweet jebus..(from here)

But this one really caught my eye:

(sold here)

I started the Fimo mission by drawing and cutting out shapes from a sheet of paper. I made a horse head pattern, cowboy boot pattern and horse shoe pattern. Then I took a piece of yellow Fimo clay and rolled it out flat. Next I placed the patterns on the clay and cut out the shape.  The same was done with the cowboy boot pattern and the horse shoe pattern.


After cutting out the shapes I carved the details with a sharp wooden tool. You can use anything even remotely sharp, for example a needle.


When the pieces were carved I added a few seed beads to the horse shoe as there were studs added to the original one.


Next I added eye pins by sticking them inside the clay. The pins are needed to attach the pieces to plastic chain.


Between the previous and the next phase the clay parts were baked in an oven to make them hard and long-lasting. Remember to follow the instructions on the clay package! It´s crucially important to set the right temperature and time. I´ve seen the horrors of not following them (the pieces looked like dog poop)..

After taking the pieces out of the oven and after letting them cool for a while, I added a piece of plastic chain to the horse head. And attached the boots and the shoe to the chain


Then I used Fimos own gloss varnish to make a glossy finish.


 Last phase was to attach a brooch pin to the back of the horse.


The end result looks like this:


Sep 21, 2013

Autumn is a second spring when every leaf is a flower. -Albert Camus

This post is all about flowers, which in this case really are late bloomers as summer has turned into autumn a while ago. 

Flowers have been a popular accessory since who knows how long, so it´s no wonder that flowers were everywhere in the 1940's also. They were attached to hair and hats, made into brooches and used to accessorize every outfit from literally tip to toe. Flower accessories were made of any material posibble: different fabrics like felt and velvet, wood, palstic, seashells and metals both precious and scrap. And of course you could use real flowers too. I didn´t find any specific info why the flowers were a big hit back then, but I assume it had something to do with the cheerful nature and beautiful colors of the flowers. Also you could find both inspiration and material for your flower accessories everywhere.

(From here)

 
(from here)

(from here)

 (sold here)

As a dedicated 40's girl I wanted something flowery myself. To make the accessory I needed the idea of a flower necklace and a huge portion of good luck. In a flea market I came across with this big plastic bag full of white plastic flower parts. These kind of flowers can be also detached from artificial flower bouquets or other similar decorational pieces.


To make the plastic flowers into a necklace, here´s everything else I needed:
- stick pins
- jump rings
- tiny stopper beads
-yellow wooden beads
- plastic chain
- a clasp
- pliers


First slide a stopper bead and a yellow wooden bead to a stick pin.


Then add the petals.


Twist the end of the stick pin into a loop with pliers..


..and add the jump ring to the loop.


Attach the flowers (I made nine flowers in total) to the plastic chain with the rings.


And tadaa! You´re done!


Or if you want to proceed you can do several with different colors!


Sep 2, 2013

Instagramming and a mystery

I´ve started instagramming! That was another (third to be exact) "I will never" in the crazy world of the internetz. The first one was blogging and the second buying a smart phone with a possibility to use internet wherever I go. I blame the second one for the third and I must admit I´m pretty hooked. But without further ado here´s my instagram account!

Then to the mystery. Lately I have come across these pictures of 1940's campus and college girls wearing huge amounts of silver identification bracelets.

(from here)
(from here)
By the way she is using clear nailpolish to hold her socks up!


Can someone tell me more about this popular trend of its day? Were the bracelets given by a friend or a special someone? Nevertheless I love the look!

Aug 7, 2013

Fringed tongue

The summer has been pretty lazy in here as well in my personal life. But that´s how summers should be, right? But now I think I will carry on revamping my shoes. The revamping in the last post was a lot work. Now I´m going to keep things simple and quick.

First, as an introduction, I must say that I absolutely love the 40's contrast colors, color blocking and two tone elegance, especially in shoes.

(From here)

 (from here)

  (from here)

(from here)

I have these lovable 1930's brown shoes that I bought in near mint condition. I have treasured them and worn them only in a few special occasions.


I adore them as they are but I needed a pair of simple shoes in solid color to test this easy way of modifying your shoes. I got an idea from this picture:

(from here)

On the shoe second from the top there is a fringed tongue. Fringed tongue is often associated with loafers that were also a popular look in the 40's. I thought the mix and match of rougher and sporty loafers and sophisticated heels looked kind of cool. So I went with the idea!

First I  dug through my supply of leather scraps to find a suitable piece and color. I ended up with forest green. Then I measured the front of the shoe and made a paper pattern. You can make the pattern in any size you want to, but I wanted to cover the lacing. Here are the measurements I used:
top: 4 cm/1,6"
side: 7,5 cm/3"
bottom: 5,5 cm/2,2"

I folded a paper in half and drew the pattern on the other side. The top of the pattern I drew on the fold so when I cut it out the pattern was duplicated and the duplicates attached from the top. I needed to make the pattern double so the leather would cope with piercing and wear. I shortened the back piece a bit. Then I drew the pattern on the leather and cut it out.


When the leather piece was cut I made some detailing to the bottom with croppers.


Next it was time to cut the fringes.


And the last step: punching the holes for shoe laces that keep the tongue in the right position. I used a leather punch too for piercing the holes. (Okay, okay. My boyfriend used it. I couldn´t press hard enough..) I folded the duplicate piece back to make even holes.


Then I pulled the laces through the holes. The duplicate is again folded back so it will strenghten the tongue.


I also found this Etsy-shop where you can buy these tongues ready made and another blog post with a DIY instructions for a bit different fringed tongue. Those findings were helpful in this project!


Jul 8, 2013

These shoes are made for walking

This will be a double post! First I will "make" the accessory and then I will make the accessory for the accessory.

I´ve 
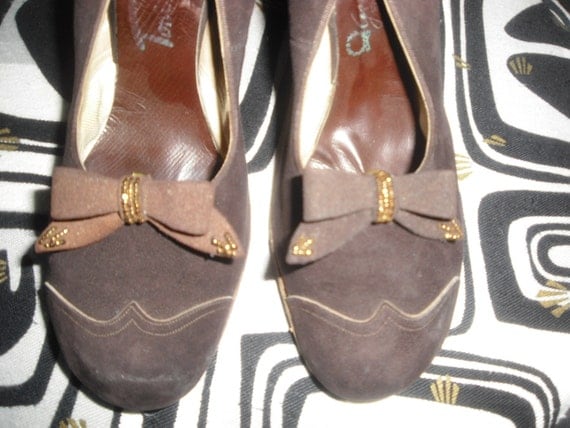
had this pair of before beautiful now dirty and scuffed 1940's pumps for a couple of years now. They were bought from a theaters flea market. That explains the topsy-turvy shape of them. In many cases the outer soles of vintage shoes are worn, but the shoes themself have lasted time great. These though are scuffy, dirty and have a sad appearance, but the outer soles are in perfect condition. Either they have only been used on the stage or the soles have been replaced. The greyish color is unusual and kind of pretty. I really have tried to make an excuse to wear them, but somehow they have stayed hidden in the back of my wardrobe.


Then an idea came to me! I decided to paint them to hide the imperfrctions and smudges. I sometimes feel a bit bad, when I see authentic vintage pieces severely shortened or changed some other way. But in this case the changes I decided to make were similar to the ones people could have made in the era the shoes belong to.

I bought a paint called Liquitex professional acrylic ink (more info of the product here). The color is burnt sienna. I got the ink from a store that sells arts and crafts supplies. The shop keeper recommended to use the ink instead of paint as it sticks better to leather and is thin enough not to crack. To spread the paint I used a bigger brush with a flat end. The little details such as seams and edges I painted with a smaller brush. Whilst painting I noticed that the ink was really light and transparent so I painted a layer after layer after layer until I had lost the count. 

The other shoe after the first layer:

Both shoes after about six layers:

Painting finally finished! I still need to go through the inside lining and rubber parts with a cotton stick and nail polish remover to tidy the spillovers.
(I must admit I almost lost all of my patience, nerves and hope with this project. Especially when I spilled half of the ink bottles content on to our balcony carpet..)


As I was waiting for the ink to dry I was (once again) browsing through Etsy and Ebay and I got inspired by some bow shaped shoe clips. Here´s something I found:
(sold here)

(sold here)

(sold here)

 I wanted to make a pair for the newly painted shoes. Earlier this year I had bought a pile of dress clip findings (from this seller) which suited fine to my puposes. The dress clips though have some sharp spikes on them that I flattened with pliers. They would propably have torn the leather of the shoes.

 Suprisingly I wanted to work with felt. I picked out burgundy and brown (although later on I did not use the brown one) colored felts and some copper colored seed beads.

First I cut out the proper pieces to make a bow. You will need a bigger piece that is about 23cm/9.1" x 2,5cm/1" and a smaller one that measures 5cm/2" x 1,5cm/0.6".

Turn the ends of the bigger piece under and stich.

Next take the smaller piece and wrap it around the bigger one. Cover the stiching you´ve just made. Leave the seam to the backside. Then stich the ends of the smaller piece together.

And voilá! You have a bow!


It´s time for the beads! I emroideried the center and made a little detailing. The possibilities are endless!

The last step is to add the clip. You can use glue or stiching. If you want to use proper shoe clips parts you can find them for example here.

 And then there´s nothing else left to do than to go out and let the world see your "new" shoes!